
Photo by Imprenta
If you’ve ever received prints with chopped-off text or weird white borders, chances are your artwork ignored one of the cardinal rules of print setup: bleed, trim, and safe zones.
These three simple concepts make the difference between a polished, professional final product and a costly, flawed reprint. But what do they actually mean? And why do they matter?
Let’s break it down.
What Is the Trim Area?
The trim is the final size of your printed piece after it’s been cut down from a larger sheet. For example, if you’re designing an A5 flyer, the trim size is 148mm × 210mm.
When you set up your artwork, the trim line is where the guillotine blade will cut. But here’s the thing—commercial printers are incredibly accurate, but they’re not perfect. There’s always a slight margin of error in the cutting process.
That’s why we need bleed and safe zones.
What Is Bleed?
Bleed refers to the area that extends beyond the trim line—usually by 3mm. This extra space ensures that when your piece is trimmed, there’s no unintentional white border around the edge.
Any background colour, pattern, or image that touches the edge of your design should continue into the bleed area. That way, if the cut shifts slightly, your design still reaches the edge.
For example:
- A business card trimmed to 90mm × 50mm should be designed at 96mm × 56mm to include a 3mm bleed on all sides.
- That means your bleed area will be cut off—but it protects your design.
No bleed = unprofessional prints with awkward borders.
What Is the Safe Zone?
The safe zone (also called the margin or inner margin) is a buffer area inside the trim line—typically 3mm to 5mm.
All important content—like text, logos, and key design elements—should stay within this zone. That way, even if the cut is slightly off, nothing crucial gets trimmed away.
Think of it as your “no-fly zone” for vital info. Anything outside the safe zone is at risk of being chopped.
Here’s a visual way to think about it:
- Bleed: content meant to be cut off
- Trim: intended final size
- Safe Zone: content that must stay intact
Real-World Example
Let’s say you’re designing a restaurant menu:
- The background photo of a pizza must extend into the bleed.
- The trim defines the menu’s finished size.
- The prices and dish names must be within the safe zone—because no customer wants to guess if a Margherita costs R90 or R900.
Missing any of these steps could mean losing vital info or paying for a reprint.
File Setup Guidelines
When creating your print-ready artwork:
- Start with the correct document size, including bleed. Most design programs like Adobe Illustrator or InDesign let you define this when you start a new file.
- Set guides for trim and safe zones so you can visually check everything is in place.
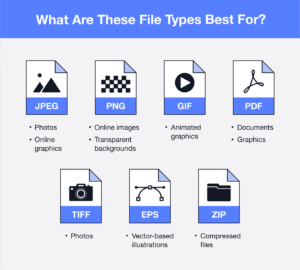
- Export as PDF with bleed and crop marks if required by your printer.
Typical bleed sizes:
- 3mm for business cards, flyers, brochures
- 5mm or more for large format items like banners or posters
Always check your printer’s specifications—they may vary slightly.
Why It Matters
You might think 3mm doesn’t matter, but in print, it’s everything. Misalignment or shifting during trimming is common, and even a fraction of a millimetre can ruin your layout.
By including bleed and respecting safe zones, you’re protecting your design from production errors and saving yourself from costly reprints or frustrated clients.
At Kawaii Labs Corporate, We Get It Right
Every day at Kawaii Labs Corporate, we receive files missing bleed, with logos too close to the edge, or text sitting right on the trim line. That’s why our print team always checks artwork before printing. But the best results start with great design practices.
If you’re unsure how to set up bleed, trim, or safe zones, we’ll guide you through it. Or even better—we can do it for you.
So, next time you’re sending something to print, remember:
Bleed outside. Trim to size. Keep the good stuff safe.
Simple. Precise. Print-ready.
